Mimics inPrint
Learn how to integrate Mimics inPrint seamlessly into your hospital’s workflow and quickly convert medical image data (DICOM files) to 3D anatomical models.
Tutorials


View more chevron_right
Recorded Webinars

How to start implementing 3D Printing in your hospital
Frequently asked questions
- Getting started
- Licenses, vouchers & CCkeys
- General
- Point-of-Care
- Syngo.via
- IFU
-
라이선스가 있는 Materialise 소프트웨어 제품의 최신 버전을 어떻게 다운로드하나요?
모든 다운로드는 https://passwords.materialise.com/에서
확인하실 수 있습니다. 자세한 지침은 문서를 읽어보십시오.
-
Materialise 소프트웨어 제품을 어떻게 설치하나요?
다른 모든 애플리케이션을 닫은 후 Materialise 소프트웨어 제품을 설치하는 것이 좋습니다. 소프트웨어를 설치하려면 관리자 액세스 권한이 있어야 합니다.
- Upon receipt of the installation file, you can start the installation wizard by double-clicking on the file
- Follow the instructions that appear during the installation. This will include specifying the installation path, accepting the EULA and other questions regarding the installation. We recommend keeping the default settings, unless specified otherwise
-
소프트웨어를 어떻게 등록하나요?
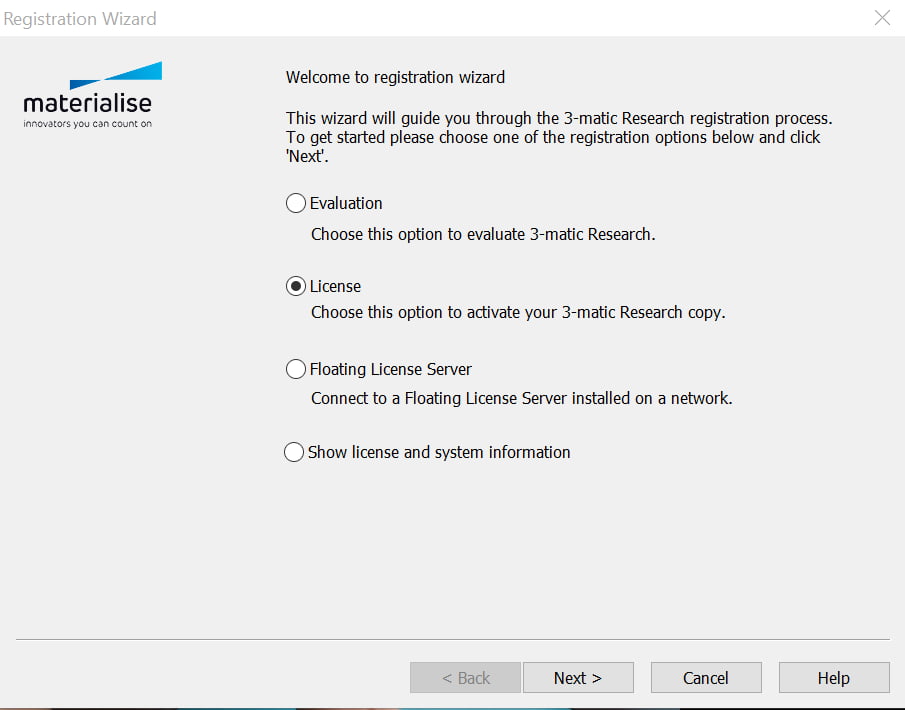
소프트웨어를 등록하고 활성화하려면 먼저 소프트웨어를 설치 해야 합니다. 설치가 완료되면 등록 마법사가 실행됩니다. 보유하거나 원하는 라이선스 유형에 따라 '평가판', '라이선스' 또는 '부동 라이선스 서버' 옵션을 선택해야 합니다.
- Evaluation: Select this option if you want to evaluate the software and you do not have a license (voucher) or key file yet
- License: Select this option to activate your software if you have a license (CCKey or voucher) or a key file already
- Floating License Server: Select this option only if you have purchased and obtained a floating license
- Show license and system information: Select this option if you want to see your System ID, a previously entered CCKey or the overview of your currently activated licenses
-
키 파일(권장) 없이 소프트웨어 (재)활성화
키 파일 없이 소프트웨어를 활성화하려면 인터넷 연결 및 유효한 라이선스(CCKey 또는 바우처)가 필요합니다. 소프트웨어를 설치 하고 실행하면 등록 마법사가 실행됩니다.
- In the registration wizard box, select the "License" option. Then click “Next”

- Select “Instant Activation”. Then click “Next”

- Enter the CCKey/voucher code that you received by e-mail (or in the DVD sleeve of your Materialise software). Multiple CCKeys (for the same System ID) can be added. Once the data entry box is filled in, click “Next”

- Please wait until the registration is complete, and then click "Finish" to start using your software

-
키 파일로 소프트웨어 (재)활성화
키 파일로 소프트웨어를 활성화하려면 이미 키 파일을 보유.하고 있어야 합니다. 받은 키 파일(.matkey)을 컴퓨터의 로컬 폴더 또는 외부 저장 장치에 저장하십시오. 소프트웨어를 설치 하고 실행하면 등록 마법사가 실행됩니다.
- In the registration wizard box, select the "License" option. Then click “Next”
- Select “I want to register a License key file I received via e-mail”. Then click “Next”

- After clicking "Browse", select the key file that you saved locally on your computer or externally. Then click “Next”

- You will receive a message that you have successfully registered the key file. Click "Finish" to start using your software
-
비상시 소프트웨어를 어떻게 재활성화하나요?
유지 관리 중인 모든 소프트웨어 라이선스는 긴급 키 파일 확보. 가능성에 따라 제공됩니다. 이 조치는 우연히 소프트웨어가 비활성화되거나 일반 재활성화 프로세스가 작동하지 않는 경우에 사용됩니다. 이 키 파일은 6일간 소프트웨어를 재활성화 하여 응급 시 작업을 계속할 수 있으며 당사 지원 팀에서 소프트웨어를 재활성화하는 데 도움을 드립니다.
유지 관리 패키지에 따라 제한된 양의 긴급 키 파일만 얻을 수 있으므로 긴급 시에만 사용해야 합니다.
-
소프트웨어는 얼마 동안 활성화되나요?
일반적으로 소프트웨어는 6개월간 활성화 상태로 유지되며 그 이후에는 라이선스를 재활성화해야 합니다
- 라이선스가 곧 만료될 경우 소프트웨어에 경고가 표시됩니다
- 특정 경우에는 라이선스 기간이 짧을 수 있습니다
CCKey 또는 바우처 코드로 로그인한 후 암호 웹 사이트 에서 만료 날짜를 참조할 수 있습니다
-
라이선스란?
라이선스는 특정 조건 하에서 Materialise 소프트웨어 제품을 사용할 수 있는 권리가 있음을 의미합니다. 유효한 라이선스(CCKey 또는 바우처 형식)가 있는 경우 소프트웨어를 활성화할 수 있습니다. 라이선스가 더 이상 유효하지 않은 경우 소프트웨어를 실행할 수 없습니다. 보유한 라이선스 유형에 따라 현지 사무실에 문의한 후 갱신하거나 연장할 수 있습니다..
기간 면에서는 다음과 같은 세 가지 기본 유형의 라이선스가 있습니다.
- Evaluation license: This license allows you to evaluate our software for a limited period of time. The software may only be used for non-commercial, trial and evaluation purposes
- Annual license: This is a commercial license that allows you to use the software during a one-year period, and will be renewed annually
- Perpetual license (only available in academic institutions): This is a commercial license that allows you to use the software for an unlimited period of time, with the exception of a license termination. An annual maintenance renewal will ensure that you are using the latest software version at all times.
또한 사용량 면에서 두 종류의 라이선스를 구분합니다
- Local license: A local license entitles one end-user to run the software on a single computer
- Floating license: A floating license allows a specified number of end-users to run the software on one or several concurrent computers in a network
-
라이선스 지속 기간이 더 긴데도 불구하고 2개월 또는 6개월간만 암호를 받는 이유는 무엇인가요?
당사에서는 보안 암호 파일을 사용하여 소프트웨어를 보호합니다. 그리고 약 6개월마다 암호 파일의 생성 방식을 변경합니다. 따라서 6개월마다 암호 파일을 갱신해야 합니다. 라이선스 암호 파일의 갱신을 신청하는 동안에도 계속해서 소프트웨어를 사용할 수 있으며 이는 무료입니다!
새 라이선스를 구매하였으나 라이선스 지불이 아직 당사 시스템에 등록되지 않은 경우 2개월간의 암호 파일만 받게 됩니다. 이는 당사에서 주문을 받은 뒤 지불을 받기 전에 고객들이 라이선스를 활성화할 수 있도록 하기 위함입니다. 시스템에 지불이 등록되면 6개월간의 암호 파일을 생성할 수 있습니다. -
Mimics에서 라이선스를 자동으로 업데이트하도록 어떻게 설정하나요?
부동 라이선스 서버가 있는 경우 라이선스로 이동하여 "라이선스 자동 업데이트(Auto Update License)"를 선택하십시오. 로컬 라이선스가 있는 경우 Mimics에서 라이선스 업데이트를 자동으로 검색하도록 설정할 수 있습니다. 이를 위해 옵션으로 이동하여 "모듈(Modules)"을 선택한 다음, "암호 요청(Password Requests)" 옵션을 선택하십시오. "Mimics에서 자동으로 Materialise 암호 서버에 접촉하여 라이선스 업데이트(Let Mimics automatically contact the Materialise password server to update the licenses)" 옵션을 활성화하십시오. 이를 활성화하려면 CCKey가 필요합니다. 이 기능을 유용하게 사용하려면 인터넷 연결이 필요할 수도 있습니다.
-
부동 라이선스 서버를 어떻게 설치하나요?
자세한 정보는 부동 라이선스 설치 가이드 를 참조하십시오.
-
시스템 ID란 무엇이며 어디에서 찾을 수 있고 변경 시 수행해야 할 작업은 무엇인가요?
시스템 ID는 당사에서 생성한 코드이며 각 컴퓨터 또는 서버에 고유합니다. 시스템 ID를 찾으려면 먼저 Materialise 소프트웨어 제품을 설치해야 합니다.
자세한 지침은 문서를 읽어보십시오.
-
(긴급) 키 파일이란 무엇이며 어떻게 얻을 수 있나요?
키 파일은 소프트웨어 라이선스를 활성화하는 작은 파일(*.matkey)입니다. 키 파일은 각 시스템 시스템 ID) 를 기반으로 함)에 고유하며 유효한 라이선스(CCKey 또는 바우처)가 있는 경우에만 얻을 수 있습니다. 자세한 지침은 문서를 읽어보십시오.
-
CCkey란 무엇이며 어디에서 찾을 수 있나요?
CCkey는 Materialise 소프트웨어 라이선스를 지정하는 고유한 코드입니다. 여러 Materialise 제품을 보유하고 있는 경우 여러 CCkey를 가지게 됩니다. CCKey는 라이선스를 활성화할 뿐만 아니라 향후 다운로드, 업그레이드 및 기타 경우에도 필요합니다. CCKey 형식은 xxxx-xxxx-xxxx-xxxx입니다.
CCKey는 이메일로 전달되거나 송장에 표시되어 있습니다.
CD 형식으로 소프트웨어를 주문한 경우 CCKey는 CD 표지 내부에 있습니다. 라이선스가 이미 활성화된 경우 등록 마법사를 통해 소프트웨어의 시스템 정보에서 CCKey를 찾을 수 있습니다.
CCKey가 없는 경우 현지 사무실로 문의하십시오.
Materialise 소프트웨어를 열어서 CCKey를 확인할 수도 있습니다. 도움말 메뉴 아래에 있는 라이선스로 이동하여 "라이선스 및 시스템 정보 표시(Show license and system information)"를 선택하십시오. CCKey가 있는 경우 맨 위에 표시됩니다.
-
바우처란 무엇이며 어디에서 찾을 수 있나요?
-
What is the difference between Mimics and Mimics inPrint?
The Materialise Mimics Innovation Suite is a toolkit-based engineering package that was developed for advanced research and development projects that relate to engineering on anatomy. It is composed by Mimics and 3-matic and it has a range of possible configurations that your local experts can help you define based on your needs.
Materialise Mimics inPrint is a workflow-based package developed to allow clinicians and hospital technicians to easily prepare a 3D model for 3D Printing, or advanced visualization based on medical images. Mimics inPrint can only be purchased by hospitals.
-
What is the optimal scanning protocol for Mimics inPrint?
Please find the scan protocols here.
-
Can I import CBCT files?
Yes, this is possible. Note that Mimics inPrint only supports DICOM images.
-
Can Materialise print the anatomical model for me?
Yes, we can. Please refer to your local office for further questions.
-
How can I import images?
From CD, PC or PACS
-
What are the system requirements for Mimics inPrint?
System requirements of Mimics inPrint are available here.
-
What is the optimal imaging format for creating 3D anatomy models?
Whether you are designing 3D anatomical models or patient-specific medical devices, excellent imaging is pivotal for the creating of accurate 3D models in the most efficient way possible. Should you use CT or MRI? Read full article
-
What sort of medical software do I need to go from scan to STL file?
3D Modeling
Materialise Mimics inPrint represents the most comprehensive toolbox to go from medical image to STL file containing your desired 3D model. First, you start by segmenting the medical scans. Preparing and augmenting the segmented anatomy of your patient’s scan often constitutes the most laborious part of the 3D modeling process. This second stage can include features such as cleaning and smoothing to remove artifacts, adding connectors to hold anatomies in the proper position, adding thickness to represent vessel walls, cutting the model to achieve optimal visualization, as well as indicating color or multiple materials. -
What I should consider before designing patient-based 3D anatomical models?
Start each case by defining the objectives of the 3D anatomy model you would like to have 3D printed. It is essential to take all considerations into account, including the requested clinical contribution, the required time and material, as well as the feasibility of 3D Printing and cleaning the model. These requirements will help you define how to prepare your 3D model. Read full article
-
How can I verify the accuracy of the 3D anatomical model you created?
Mistakes are easy to make. Before you 3D print your model, you should verify the accuracy of your final file against the original DICOM imaging. Did you over-smooth and remove a key feature from the model? Did you cut away a structure that could be a key landmark for the surgeon? By overlaying the STL surface on the original DICOM data would be the most efficient way to validate the accuracy of your result. This also allows you to make subtle adjustments or refinements to the model. -
Why should I label the 3D-printed parts? And how?
The traceability of your 3D-printed models reduces the error risk within your 3D printing framework. As you scale your operation and start creating greater volumes of anatomical models, it is critical to know which part belongs to which case. To reduce the risk of mixing up models or, worse, providing a surgeon with the wrong anatomical model, each 3D-printed model should be labeled prior to printing: the medical 3D modeling software Mimics inPrint allows you to do so.
Use a requisition number referring to the medical records to ensure the traceability of your 3D anatomy models. Moreover, labels are required if you want to create mirror images or want to indicate what side of the patient the model was derived from. This will help reducing the chances of the surgeon getting confused.
You can easily label the model during the creation process by using the tool 'label’.
-
How can I ensure the 3D printability of the created STL file?
The STL file format is the universal digital 3D-modeling format for 3D Printing that will be fed to a 3D printer so it can slice and build the required part. However, not all STL files are created equally. The number and quality of the triangle facets will determine the eventual quality of your 3D-printed model. Sometimes, very thin walls in the model may fall below the minimum resolution of your 3D printer or will end up being brittle and tear-sensitive.
Before proceeding with the actual 3D printing, please make sure to use the 'STL diagnostic and fixing tool'. This tool helps you ensure that your model can be technically 3D printed while also taking into account the shape and thickness of all walls.
-
Why use 3D-printed anatomical models?
The applications of 3D Printing in medicine are expanding. The 3D anatomy models created with Materialise Mimics inPrint and printed with compatible 3D printers can be incorporated into the clinical framework to facilitate a realistic 3D view of the pathology, enabling a multidisciplinary communication leading to the best patient-specific treatment proposal. Additionally, 3D-printed models can be used as an educative tool both to train tomorrow’s medical experts and try out surgical procedures before entering the operating room. Moreover, 3D anatomical models can help improve your patient communication.
The most frequent clinical cases where 3D anatomical models have proven to be useful include cardiovascular cases ranging from structural cardiac defects to congenital heart diseases; complex fractures, cranio-maxillofacial reconstructions, genitourinary surgery, and more.
-
I have an STL file, how do I start with 3D printing?
First, we recommend estimating the total volume of cases your department or hospital wants to 3D print and, based on this estimate, comparing two approaches: insource and outsource. Outsourcing 3D Printing allows you to minimize your upfront investment, but is typically associated with longer lead times.
Outsourcing can, however, be advantageous in the rapidly evolving market of medical 3d printing companies. What you invest in today, could soon be obsolete as more advanced and lower-cost technology is brought to market. From a purely economic standpoint, outsourcing the first cases would be the best strategy.
Insourcing gives you control over the complete process and enables you to create models faster for urgent cases. This step does, however, require a considerable investment. Alternatively, desktop 3D printers offer a great solution to make your first steps in in-house 3D Printing. The following list of printers been validated for use with the FDA cleared Mimics inPrint software for the creation of diagnostics 3D models.
-
What else can I use Materialise Mimics inPrint for?
Not every case needs to be 3D printed. In addition to the STL file, you can use Materialise Mimics inPrint to generate a 3D PDF to visualize the accurate 3D anatomy model on your screen and share it with your team. Some hospitals even insert a 3D PDF into the medical report. -
What is the average cost of printing 3D anatomical models?
The cost of 3D Printing is mostly influenced by the technology used and the overall size of the part you wish to print. Relatively small-sized models, such as a baby heart, printed in a single color using desktop stereolithography (SLA) probably cost up to a few tens of euros. Larger multi-color, multi-material models, such as a liver model, could easily reach up to a few thousand of euros. For a more accurate assessment of the potential technology and its associated cost for your hospital, please contact us.
-
How to implement 3D Printing in my hospital?
Successfully deploying a point-of-care 3D Printing is a staged process. The golden rule says: start small and lay out a plan for growth. By launching on a small scale, it will help build momentum with clinicians and administrators to support the activity. Make sure to learn from experts in the field. Master the process from image acquisition through 3D printing. This will ensure that you avoid common pitfalls and operate in the most efficient way possible.
Watch this webinar to learn more on how to succeed in deploying 3D printing for medical use.
-
What 3D Printing technologies are suitable for 3D Printing in medicine?
Professional 3D printers come with different technologies, and all of them have their advantages. FDM, PolyJet, laser sintering, stereolithography and ColorJet Printing all bring unique advantages for specific applications. Resolution, speed, materials, color, and, of course, cost are all key factors you should consider. We recommend consulting industry experts to understand what technology makes the most sense given your case volume and available budget.
In addition to determining the most appropriate 3D printer, you’ll also need to think about the space required to house it. Certain printing technologies take up a very small area, while others may require dedicated facilities. Some machines need additional equipment to clean the models after printing, others come with higher maintenance requirements. It is necessary to fully understand all of these considerations before making your choice.
-
Who should be responsible for a Point-of-Care 3D Printing in your hospital?
Running an effective Point-of-Care 3D Printing in your hospital requires a specific skill set. Firstly, an accurate segmentation asks for a team member with a thorough knowledge of imaging and anatomy/pathology. Next, preparing 3D models for 3D Printing requires some engineering skills. Additional resources may be needed to clean 3d-printed anatomical models and maintain the machines. Above all, the scale of your operation will determine the resources.
There is, however, one overarching requirement for all team members: to be part of a bigger network allows you the tap into the latest trends and innovations by, for example, attending relevant events and workshops.
-
How can I empower the model request communication within my hospital?
Fostering a close collaboration between staff members is key to effective communication. The scope and use of the 3D-printed model should be defined in consultation with the surgeon or interventionist before starting the process and verified towards the end. This can be facilitated through web meetings or face-to-face discussion.
Additionally, it can help to have a software solution capable of exporting a file format that can be examined by the surgeon. It is possible the surgeon in question will not be able to open an STL file. Exports such as 3D PDFs can be an excellent tool for this purpose.
Start small and lay out a plan for growth. Launching on a small scale will help build momentum with clinicians and administrators to support the activity. Make sure to learn from experts in the field. Master the process from image acquisition through 3D printing. This will help you avoid common pitfalls and make sure you operate in the most efficient way possible.
-
What can I expect from the trial period?
The trial grants you 90 days of full access to the Mimics inPrint medical software, and starts once you click the ‘get now’ button in the syngo.via open apps store. You will have the opportunity to create your own specific 3D anatomy model while getting the most guidance as you go from medical scan to 3D visualization and printable file. You will get additional information on your trial and the use of the software sent to you through e-mail. -
Can I replicate available workflows on my own data?
Materialise Academy offers you a series of representative workflow videos illustrating how to create specific 3D-printed models using medical software. These workflows can be replicated on your own data sets. -
Are there other benefits to having Materialise Mimics inPrint integrated within the syngo.via platform?
Integrated in your clinical environments, the software holds fast and efficient 3D printing workflows with a direct link to 3D printing as a service or in-house. The integration in syngo.via facilitates the efficient transfer and exchanging of data, as well as archiving the results. -
What are the minimal requirements to run 3D medical software?
The Materialise Mimics inPrint software available in OpenApps runs on the existing Syngo.via hardware setup. You do not require additional hardware or software. Please contact your Siemens representative for more information. For a direct deployment of the software, please refer to our minimal system requirements.
-
Can I use the Mimics inPrint software on multiple computers?
Materialise licenses the Mimics inPrint software based on a single concurrent user and does not restrict the number of computers on which the software can be installed. For installations within Syngo, via OpenApps, all workstations running the Syngo.via software can access the software. -
Is this a modular software or a one size fits all?
The Mimics Print software is modular. Different modules correspond to different clinical interests, such as creating 3D bone models or designing vascular models. During your 90-day trial on OpenApps, you will have access to the fully featured version. Depending on your needs, you may prefer to configure the software differently and we are happy to suggest a more suitable configuration. Your Materialise contact person is always there for you to make sure you benefit from the best setup available. -
Can I extend my trial after 90 days?
While we cannot extend your trial on the syngo.via OpenApps platform, you can always contact us to find the best solution for you. Feel free to reach out to us. -
What is the next step if I wish to continue using the 3D software after the trial?
During your 90-day trial period, we provide you with additional information regarding your trial and inform you about the different ways to get in touch with Materialise. We recommend you to reach out via any of these channels to talk to your Materialise representative. They are happy to create a custom offer that meets your needs. Once approved, we will activate your license for the agreed-on duration. -
Electronic Instructions for Use

Can’t find what you’re looking for?
Our Help Center supports all of our products, tutorials, and other resources located in the Materialise Academy. Our support team is also available to answer your questions and provide assistance whenever possible.
Our product
Materialise Mimics inPrint
From scan to 3D model with ease