How to Reduce THA Planning Time for LLD and Femoral Offset by 25%
Challenge
Performing hip surgeries requires planning to find the best solution
Solution
Comparing options for the best surgical approach in less time
Solution used
OrthoView 7.3 and the SmartHip automated wizard
Insight/how
Ease of manipulating the templates on screen and compare options
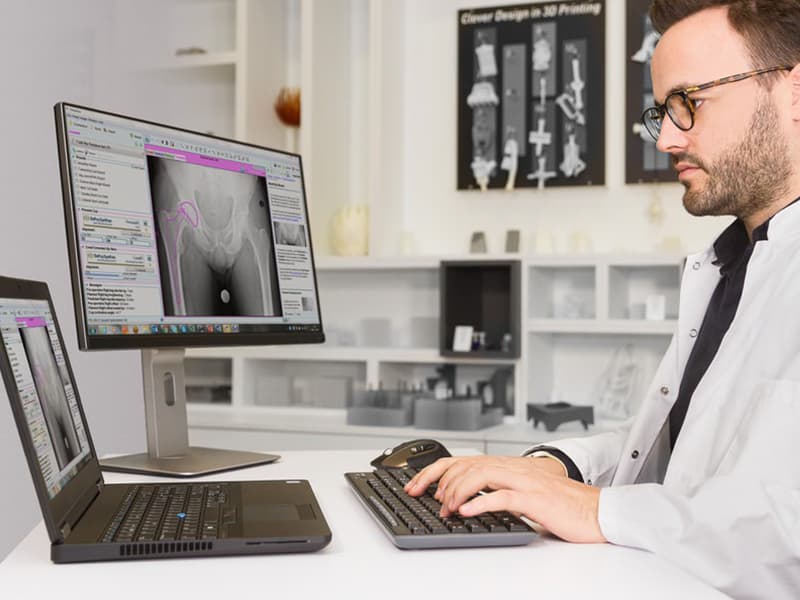
Dr. Noble shares with us some of the ways in which he has been able to get more of the vital pre-surgical information that he requires for a successful surgery and ultimately plan each case in less time. As Dr. Noble put it in his own words: “Planning my surgeries in OrthoView helps me mentally prepare for the OR and gives me the reassurance that I have considered all the options for achieving a good biomechanical outcome for my patient.”
Using the automated wizards
I have used Materialise OrthoView as my templating solution at the Palm Beach Institute since 2011. With each new version I have noticed new developments in the software that have made it increasingly quick and easy to identify the key information necessary for a smooth and successful surgery. I now spend about 2 minutes less time per patient by using the automated wizards provided in the latest version.

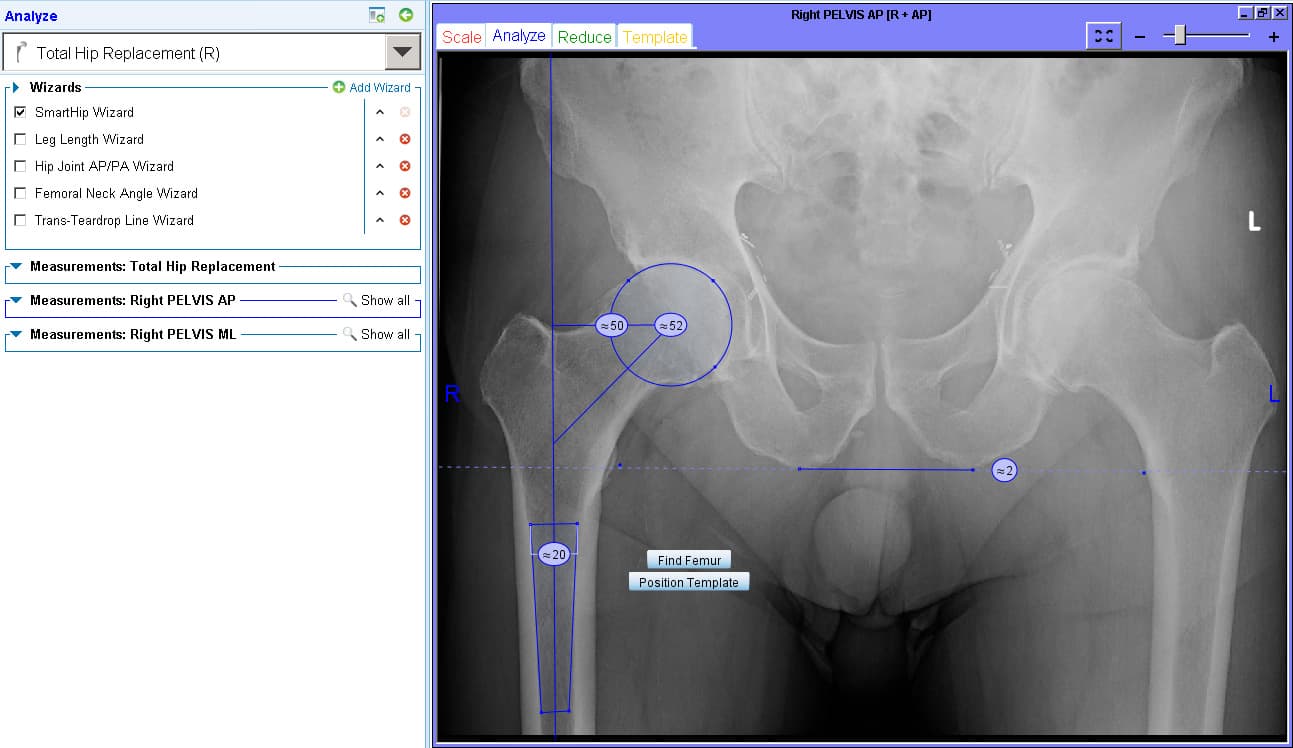
With minimal mouse clicks, the automated wizards in Materialise OrthoView use algorithms to help match the template to the patient’s anatomy. I use SmartHip in Materialise OrthoView as my standard planning wizard, to identify the size of cup and stem to use as well as the position that will give the best outcome for my patient. The SmartHip wizard reduces the time I take to select the size and location of templates. The software will size and place the femoral component on the X-ray image for me so that I don’t normally have to do this step, unless the X-ray has poor resolution.
I also have the option of looking back at the Analyze tab to check the position of the wizard and make adjustments if needed.
Correcting the femoral offset
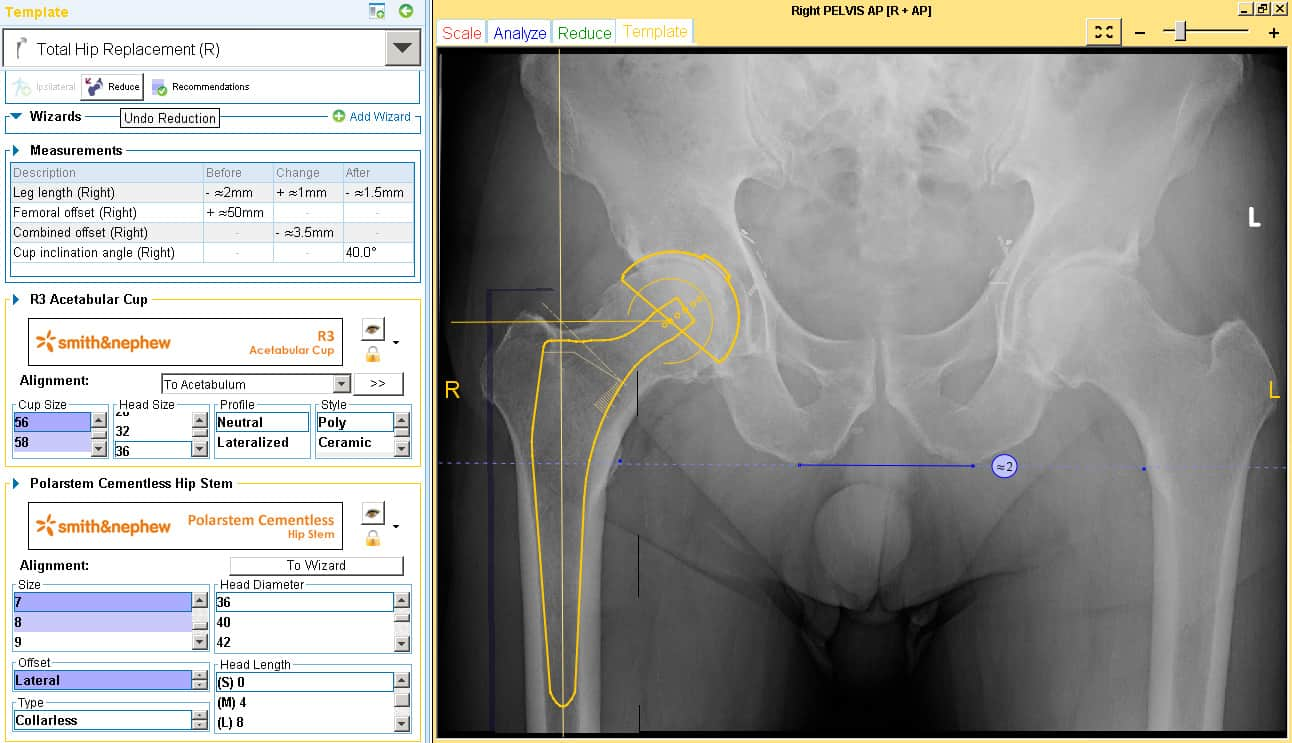
I start with a standard offset stem and use the Reduction tool to check the offset. In this case I can see that it does not match the pre-op offset on the contralateral side. The software tells me there is 6.5mm loss of offset and I therefore need to change to a high offset stem.
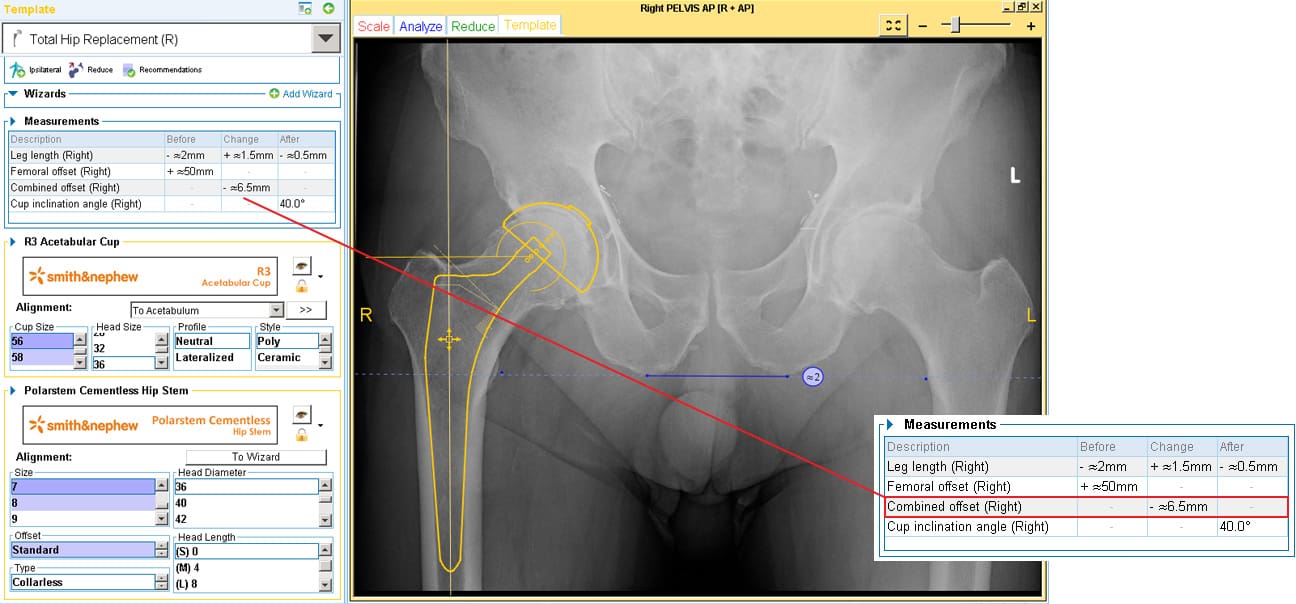
By changing to a high offset stem I can easily see that it better matches the patient’s anatomy. The wizard ensures that the new template lands on the image in the correct location and only small adjustments in template position may be necessary.
“Planning my surgeries in OrthoView helps me mentally prepare for the OR and gives me the reassurance that I have considered all the options for achieving a good biomechanical outcome for my patient.”
Andrew Noble, hip and knee specialist, Palm Beach Orthopaedic Institute, Florida
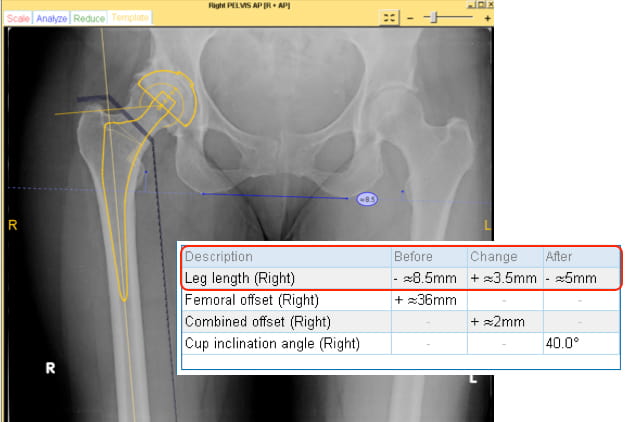
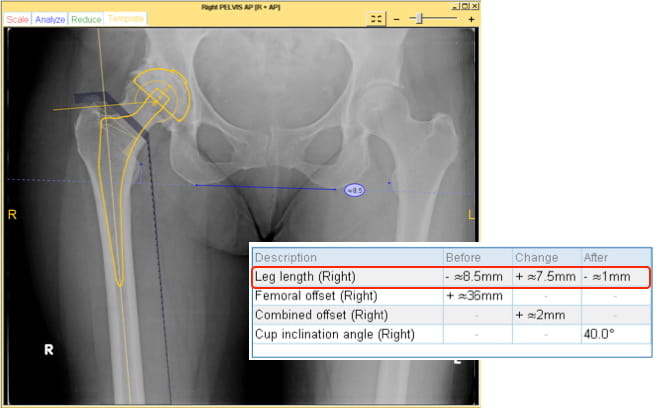
Correcting a leg length discrepancy
When I use the Reduction tool, I can adjust the position of the stem or choose different neck options to correct leg length differences and visualize the change based upon the trans-ischial or trans-teardrop line. And the software provides me with the LLD values pre-op and with the implant selection. In this example, I chose a +4 NECK LENGTH HEAD implant to correct the leg length difference as demonstrated with the reduction wizard.
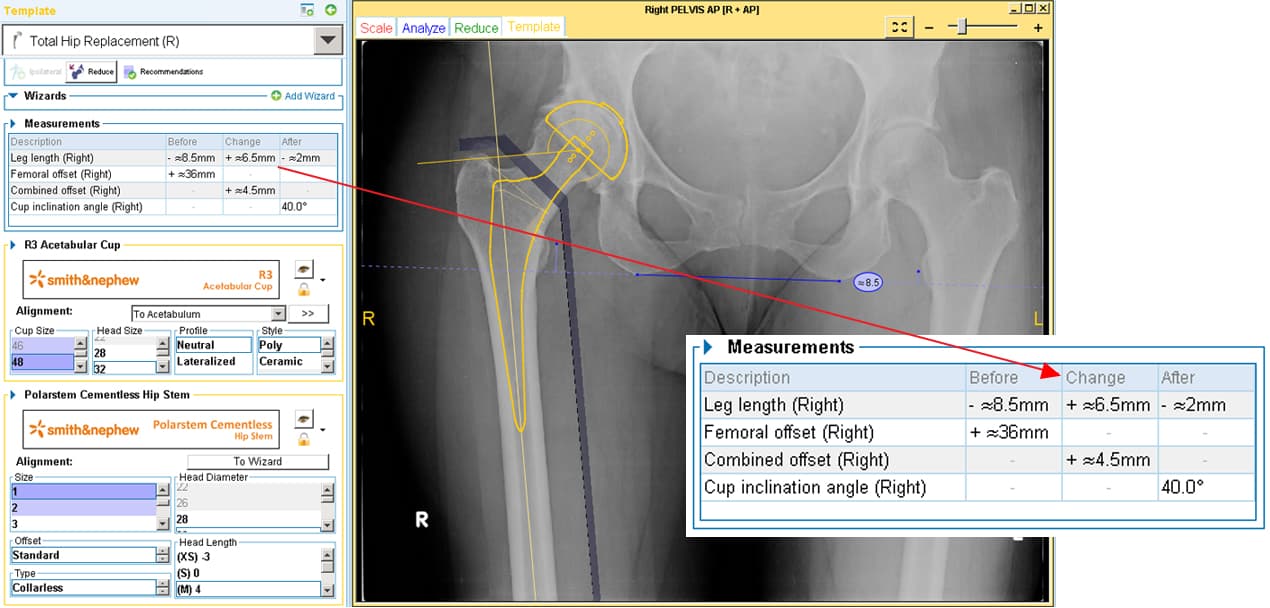
Another option is to move the implant more proximal inside the femur, and use the +0 NECK LENGTH HEAD. This adjustment of the femoral stem position can be performed while using the reduction tool, to visualize the change in position of the lesser trochanter in relation to the trans-ischial / trans-tear drop line.
Using the plan to communicate with the OR team and implant representative
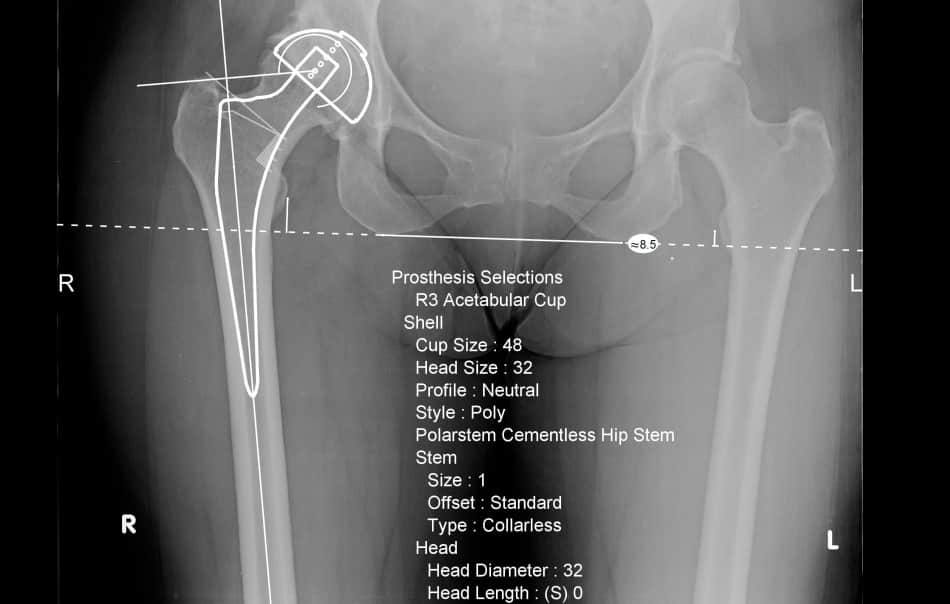
Having a digital plan that I can easily share with the OR team and the implant rep allows them to be prepared for surgery. My plan tells the team for example what size of stem and acetabular cup to have ready in the OR room and which reamers to prepare. This is particularly important when a non-standard size or implant is needed. I also have the plan displayed on a large screen in the OR to reference during the case.
Other time saving features
I use a default acetabular cup inclination angle of 40º and have entered this as my preference in the software, so that I don’t have to spend time manipulating the template on the screen and am assured of having the right angle every time.
There are other things I can fix as preferences in the software, such as magnification percentage and automatic placement of the suggested size femoral and acetabular templates onto the X-ray, each of which save a bit of planning time by giving me my preferred measurements automatically.
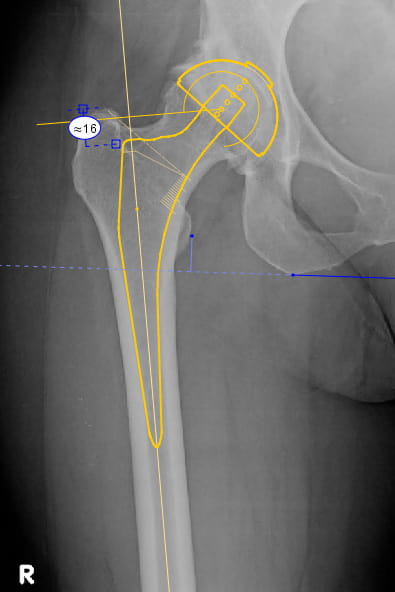
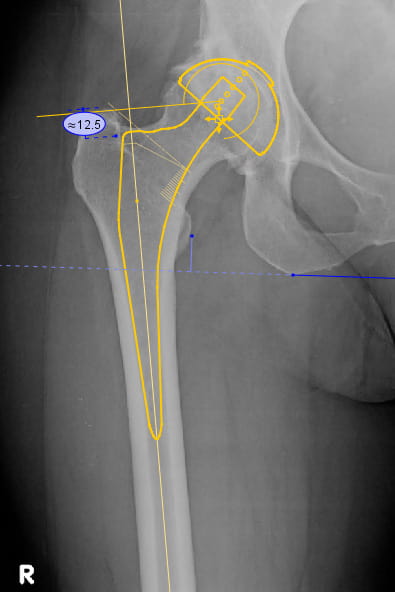
The Femoral Depth Insertion Wizard identifies the measurement from the tip of the greater trochanter and you can see it change as you move the stem up and down. Here I changed the depth from 16 to 12.5mm from the tip of the GT as I adjusted stem position.
Comparing options and avoiding mismatches
It’s easy to manipulate the templates on screen, compare options and switch between templates in the software. The pre-operative plan helps to see how medial I need to go with my cup and how to position the stem, as well as which size to choose. For example, I can see in advance whether to select a higher or standard offset stem.
I use Smith and Nephew POLAR3 prostheses. Although I know my preferred components very well, and can identify very quickly which stem and cup options are most appropriate, it is reassuring to know that the software avoids mismatched head size to cup diameter and provides other templating options for unusual or revision situations.
Conclusion
Planning my surgeries in Materialise OrthoView helps me mentally prepare for the OR and gives me the reassurance that I have considered all the options for achieving a good biomechanical outcome for my patient.
Using Materialise OrthoView 7.3 and the patented, automated wizards has definitely reduced the amount of time I spend on planning for hip replacements. My planning time has already reduced by as much as 25% and I look forward to the further innovations in pre-operative planning to come with Materialise OrthoView 8.
For more information on Materialise OrthoView: Visit materialise.com/orthoview, or contact your account manager at orthoview@materialise.com.
Images courtesy of Dr. Andrew Noble.
Want to know more?
You can hear Dr Noble describe how he uses Materialise OrthoView software to plan his hip cases (focusing on achieving the correct offset and leg length difference for patients with non-standard anatomy) on the Materialise booth at AAOS 2019 in Las Vegas.