Mimics Innovation Suite
Sharpen your skills and develop leading-edge medical device designs, personalized implants, and surgical treatments to support you on your mission to improve patient care.
Get started
Download your License Starter Kit and learn how to set up the Mimics Innovation Suite software.
How to get started with Mimics (video tutorial)
Mimics User Certification training
Join our online training course to learn how to master the Mimics Innovation Suite directly from Materialise experts.
Discover how to create accurate virtual 3D anatomical models for advanced 3D analysis, planning, personalized device design, finite element meshing, and 3D printing.
Expand your knowledge
Tutorials
Follow a video training session to discover segmentation, analysis, design, FEA, scripting, and 3D printing.
Powerful Insights Webinar Series
Follow the series and discover how powerful insights lead to inspiring outcomes.
Recorded webinars
Get inspired by recorded videos hosted by leading experts on segmentation and analysis, design and FEA, scripting, 3D printing, and population-driven design.
Community
Sctipting forum
Join our scripting forum and discover Python scripts that make the most out of Mimics Innovation Suite API.
Training courses
Learn how to use Mimics tools on the spot, step-by-step by one of our experts.
Need a more customized training at your company?
Please contact us to request a personal training.
Frequently asked questions
- General
- Getting started
- Licenses, vouchers & CCkeys
- Software interface
- Scripting
- Import & Export
- Segmentation
- Design & mesh optimization for FEA
- IFU
-
Does the Mimics Innovation Suite run on a Linux platform?
Yes! It does. Mimics is a Windows-based software program which should run within an emulator on a Linux plattform. Mimics and 3-matic have been used without any problem and with negligible performance loss in a combination between Fedora* and the virtual box as an Emulator.
The exact version of Fedora: Linux r2.6.22.14-72 (Fedora 6) with the virtual box version:""virualbox_1.6.0_30421_fedora7_1 (it is the box of Fedora 7 installed on Fedora 6).
You just need to start the virtual box and install/start your Mimics License.
*Fedora is a Linux-based operating system that showcases the latest in free and open source software.
-
Does the Mimics Innovation Suite run on a MAC?
No, unfortunately it doesn't. You can run Windows virtually on your MAC to use the Mimics Innovation Suite. Note that the software might not run optimally this way.
-
What are the Recommended System Requirements for Mimics?
You can find the minimum and recommended system requirements for Mimics here
-
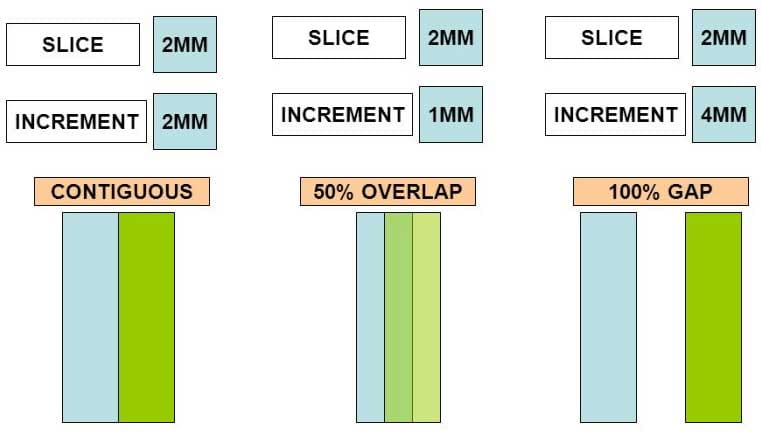
What is the difference between slice thickness and slice increment?
Slice thickness and slice increment are central concepts that surround CT/MRI imaging. Slice thickness refers to the (often axial) resolution of the scan (2 mm in the illustration). Slice Increment refers to the movement of the table/scanner for scanning the next slice (varying from 1 mm to 4 mm in the illustration).
It is acceptable and common to have an overlap in these values. The slice thickness is an important factor in understanding the resolution of your images. If the scan has a slice increment greater than the slice thickness, there is no information about the skipped section, so anatomical information or objects might not show up on the scan.
Click on "Image" > "Organize Images", and you will see listed the slice increment of each slice (0.625 mm in the example shown here). The slice increment is important as Mimics uses this for calibrating the project to ensure all measurements are correctly performed. Slice thickness is displayed in Project Information as copied from the DICOM Headers. Both slice thickness and slice increment play a role in performing a 3D (Gray Value) interpolation in Calculate 3D.
-
What is the difference between a pixel and a voxel?
The reconstructed output from a scanner (CT/MR) is a stack of images. These images consist of pixels. Every pixel has certain dimensions (XY, where mostly X=Y) and a certain gray value that is related to the material it represents. The images are a certain distance apart (Z). This distance gives the pixels a certain depth; a VOlume piXEL is called a voxel. It has XYZ dimensions.
-
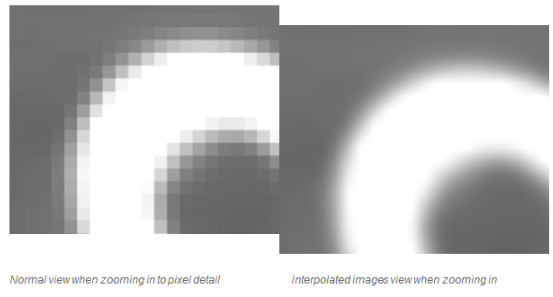
Why do I see pixels when I zoom in?
Pixels are the result of the scan resolution. To avoid it, you can choose to see Interpolated Images in the “View” menu. This will interpolate the pixels and result in a slightly blurred image. Changing it does not affect 3D accuracy.
-
Can I use this software for teaching?
The Mimics Innovation Suite can be a powerful aid in teaching. If you want to teach your students using our software, we have a student edition available, which has limited import functionalities. Please contact your local account manager for more information.
-
Can I use this software for my academic research?
Yes, for academic institutes who do not need our software for clinical or commercial use, we have dedicated offers, giving you access to the suite at an academic rate.
-
What is the added value of software maintenance?
The Software Maintenance Plan (SMP) ensures you get all the benefits out of your software and reduces your business risk in case of software or hardware issues.
For all details on the SMP, see
www.materialise.com/en/software/customer-services/maintenance-package -
How can I download the latest version of my licensed Materialise Software product?
All downloads can be found on https://passwords.materialise.com/
For detailed instructions, please read the article.
-
How do I install my Materialise software product?
We recommend that you close all other applications before installing your Materialise software product. You must have administrative access to install the software.
- Upon receipt of the installation file, you can start the installation wizard by double-clicking on the file
- Follow the instructions that appear during the installation. This will include specifying the installation path, accepting the EULA and other questions regarding the installation. We recommend keeping the default settings, unless specified otherwise
-
How can I register my software?
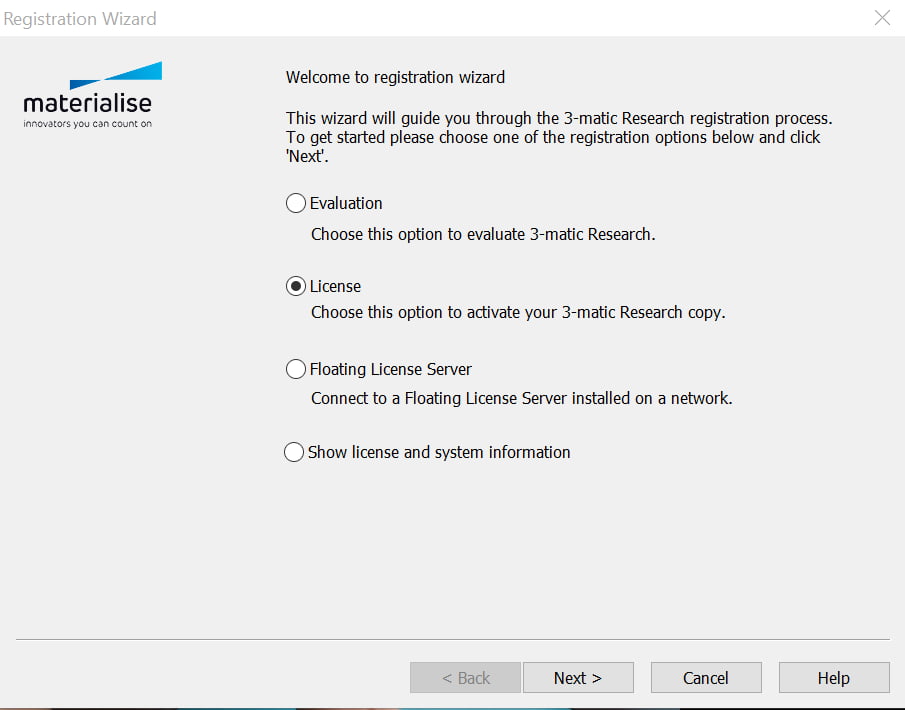
In order to register and activate your software, you will need to install it first. Upon completion of the installation, the registration wizard will open. Depending on the type of license that you have or want, you will need to select one of the 'evaluation', 'license' or 'floating license server' options.
- Evaluation: Select this option if you want to evaluate the software and you do not have a license (voucher) or key file yet
- License: Select this option to activate your software if you have a license (CCKey or voucher) or a key file already
- Floating License Server: Select this option only if you have purchased and obtained a floating license
- Show license and system information: Select this option if you want to see your System ID, a previously entered CCKey or the overview of your currently activated licenses
-
(Re)activating a software without a key file (recommended)
To activate your software without a key file, you need an internet connection and a valid license (CCKey or voucher). After installing and running the software, the registration wizard will open.
- In the registration wizard box, select the "License" option. Then click “Next”
activating%20a%20software%20without%20a%20key%20file%20(recommended)%201.jpg)
- Select “Instant Activation”. Then click “Next”
activating%20a%20software%20without%20a%20key%20file%20(recommended)%202.jpg)
- Enter the CCKey/voucher code that you received by e-mail (or in the DVD sleeve of your Materialise software). Multiple CCKeys (for the same System ID) can be added. Once the data entry box is filled in, click “Next”
activating%20a%20software%20without%20a%20key%20file%20(recommended)%203.jpg)
- Please wait until the registration is complete, and then click "Finish" to start using your software
activating%20a%20software%20without%20a%20key%20file%20(recommended)%204.jpg)
-
(Re)activating a software with a key file
To activate your software with a key file, you must have the key file already. Save the key file you have received (.matkey) in a local folder on your computer or on an external storage device. After installing and running the software, the registration wizard will open.
- In the registration wizard box, select the "License" option. Then click “Next”
activating%20a%20software%20with%20a%20key%20file%201.jpg)
- Select “I want to register a License key file I received via e-mail”. Then click “Next”
activating%20a%20software%20with%20a%20key%20file%202.jpg)
- After clicking "Browse", select the key file that you saved locally on your computer or externally. Then click “Next”
activating%20a%20software%20with%20a%20key%20file%203.jpg)
- You will receive a message that you have successfully registered the key file. Click "Finish" to start using your software
activating%20a%20software%20with%20a%20key%20file%204.jpg)
-
How can I reactivate my software in case of emergency?
Every software license that is under maintenance comes with the possibility of obtaining an emergency key file. This measure exists in case your software deactivates by accident and the normal reactivation process does not work. This key file reactivates your software for six days, which allows you to continue your work in case of emergency, while our support team will help you to reactivate your software.
Please note that you can only obtain a limited amount of emergency key files, depending on your maintenance package, so it should only be used in an emergency.
-
How long will my software remain activated?
In standard cases, your software will remain active for 6 months, after which you will be required to reactivate your license. Your software will display a warning in case your license is about to expire. In certain cases, the duration of the license might be less long:
- If your license payment is still due, the initial activation will be for 6 weeks only
- If your license (e.g in case of an annual or evaluation license) is valid for less than 6 months, the activation will be for the remaining period only
You can consult the expiration dates on the password website after logging in with your CCKey or voucher code.
-
What is a license?
A license means having the right to use a Materialise software product under certain conditions. If you have a valid license (in the form of a CCKey or voucher), you will be able to activate your software. If your license is no longer valid, you will not be able to run the software. Depending on the type of license you have, you can renew it or prolong it after contacting your local office.
In terms of duration, there are three main types of licenses:
- Evaluation license: This license allows you to evaluate our software for a limited period of time. The software may only be used for non-commercial, trial and evaluation purposes
- Annual license: This is a commercial license that allows you to use the software during a one-year period, and will be renewed annually
- Perpetual license (only available in academic institutions): This is a commercial license that allows you to use the software for an unlimited period of time, with the exception of a license termination. An annual maintenance renewal will ensure that you are using the latest software version at all times.
Furthermore, we differentiate between two types of licenses in terms of usage
- Local license: A local license entitles one end-user to run the software on a single computer
- Floating license: A floating license allows a specified number of end-users to run the software on one or several concurrent computers in a network
-
Why do I receive a password for only 2 or 6 months, even though my license lasts longer than that?
We safeguard our software by means of using security password files. About every 6 months, we change the way a password file is generated. Therefore, you will need to renew your password file every 6 months. You will still be able to use our software as long as you apply for the renewal of your license password file – this is free to do!
If you bought a new license and the payment of your license was not registered in our system yet, you will only receive a two-month password file. This is because we allow our customers to activate their license once we receive the order, and before we receive the payment. Once the payment is registered in our system it will be possible to generate six-month password files. -
How do I set Mimics to automatically update the license?
When you have a Floating License Server, go to License and select "Auto Update License". If you have a local license, you can set Mimics to automatically retrieve license updates. To this end, go to Options, choose "Modules" and select the option "Password Requests". Enable the option "Let Mimics automatically contact the Materialise password server to update the licenses". You will need a CCKey to enable this. Please note that you also need internet connection to benefit from this feature.
-
How can I set up a floating license server?
Please consult our Floating License Installation Guide for more information.
-
What’s a system ID, where can I find it and what to do when it’s changed?
Your System ID is a code generated by us that is unique to each computer or server. To find the System ID, you will first have to install your Materialise software product.
For detailed instructions, please read the article.
-
What’s a(n) (emergency) key file and how can I obtain?
A key file is a small file (*.matkey) that will activate your software license. The key file is unique to each system (it is based on your System ID) and can only be obtained if you have a valid license (CCKey or voucher). For detailed instructions, please read the article.
-
What’s a CCkey and where can I find it?
The CCkey is the unique code that specifies your Materialise software license. If you have multiple Materialise products, you will have multiple CCkeys. The CCKey is needed to activate your license, but also for future downloads, upgrades and other occasions. The format of the CCKey is xxxx-xxxx-xxxx-xxxx.
Your CCKey is communicated to you by e-mail and/or mentioned on the invoice.
If you ordered your software in CD format, the CCKey can be found on the inside of the CD sleeve. If your license has already been activated, you can find the CCKey in the system information of the software, via the registration wizard.
If you do not have a CCKey, please contact your local office.
You can also verify your CCKey by opening your Materialise software. Go to Licenses under the Help menu and select "Show license and system information". If you have a CCKey, it will be shown at the top.
-
What’s a voucher and where can I find it?
A voucher is a unique code, just like a CCKey, that activates your Materialise software license. Unlike a CCKey, a voucher is not necessarily connected to a commercial license but will often serve to activate evaluation licenses. The format of a voucher is xxxx-xxxx-xxxx-xxxx.
In most cases, your voucher will be communicated to you by e-mail together with the download link for your software evaluation.
If you do not have a voucher yet, please register your software (by choosing an evaluation license) or contact your local office.
-
How can I update my preferences?
In Mimics you can find the "Preferences" under the "Edit" menu. In 3-matic they can be found under the "Options" menu.
-
How can I change the Autosave Frequency for recovery files in Mimics and 3-matic?
In Mimics, go to the "Preferences" under the "Edit" menu. Under the "General" tab, you can set the Autosave Frequency under "Performance". In 3-matic, go to the "Preferences" under the "Options" menu. Under the "General" tab, you can set the Interval of the Recovery file.
-
What is the Project Management tab? And how can I enable it?
The "Project Management" tab in Mimics is the bar on the right side of the screen that contains lists of all the operations done on the dataset; it lists your masks, measurements, parts, STLs, etc.
You can toggle its visibility by clicking “View”, “Project Management”, and then “Project Management Tabs”. If you want to restore the layout to default, click on “View”, “Project Management”, and then “Reset Project Management Layout”.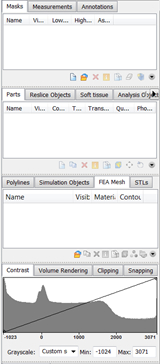
-
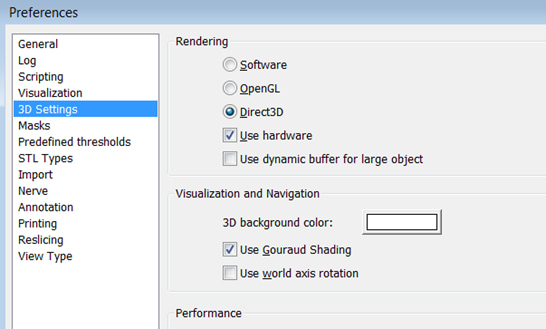
Can I change the background color of my 3D view?
Yes, in Mimics, go to the Preferences under the Edit menu. In the 3D Setting tab, change the 3D background color under Visualization and Navigation. You can also change your background color in 3-matic. To do so, go to the Preferences under the Options menu. In the tabs, select Viewport under Visualization and then set the Background color according to your preference.
-
What do the numbers in the axial view mean?
The bottom-left number in the axial view is the slice position according to the patient coordinate system (this information is read from the DICOM header upon import). The bottom-right number in all views is the slice position in Mimics. It starts at 0.00 and increases with the slice distance.
The slice distance in the sagittal and coronal views corresponds to the pixel size since these views are reconstructed by Mimics from the original axial data. The slice distance of the axial images can be checked under "File" > "Organize Images".
-
My part rotates out of view in the 3D window, why is that?
When rotating a part in the 3D view, Mimics rotates around the virtual center of all visible parts. Here the coordinate system also counts as a visible part. Furthermore, a part can be outside of your view but still be 'visible'. To rotate around just your part, make all other 3D parts invisible and turn off the coordinate system.
-
How can I edit my mask in 3D?
The tool "Edit masks" allows you to edit your mask directly in the 3D view. To do so, you need to have “Toggle mask 3D preview” turned on. This generates a 3D preview of your segmentation mask that you can work on (fourth button from the top next to the 3D viewport.
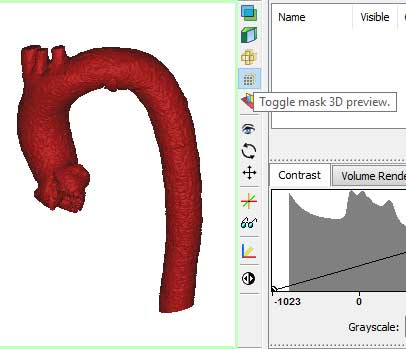
Note that in Mimics 18 and earlier versions, to edit masks in 3D, you have to use the “Edit masks in 3D” function in the “Segment” menu.
-
Which languages are supported by the Scripting module in Mimics?
The Scripting module makes use of Python.
-
Where can I find out more about Scripting in Mimics?
You can read more about Scripting in Mimics on the Scripting Forum.
-
What is the optimal scanning protocol for the software?
You can find scanning protocols for the most used applications via this link.
-
What does DICOM stand for?
DICOM is a file format widely used in clinical settings where images can be shared, and includes 'DICOM tags' which are essentially a header file containing information about that particular image.
DICOM is the abbreviation for Digital Imaging Communications in Medicine.
-
Can I import Ultrasound data?
Importing Ultrasound data is possible in the Research version of Mimics, and in the Medical version from Mimics 24 onwards. Here you can find more information on how to export DICOM data from your Ultrasound machine for GE and Philips. For more detailed information on the allowed Ultrasound data formats and restrictions, you can consult the following Mimics User Guide article: “Reading 3D Ultrasound Data”.
-
What is CT/MR/Cut Air/Lossless compression?
These compressions are a form of noise reduction, they work as follows.
Lossless:
No compression.CT compression:
Medical CT scanners work with the Hounsfield scale. See the item about Hounsfield Units for more information. Since there is no tissue type that generates gray values from -1024 HU to -824 HU (first 200 values), the values in this range are typically just noise. CT compression then sets these values to -1024 HU.
Note that technical CT scans might contain materials within this range, so for these types of scans, this CT compression should not be used. In that case, choose Lossless.MR compression:
For MR there is no defined standardized scale like the Hounsfield scale for CT. Typically the noise is present in the first 10 values. MR compression sets these values to 0.Cut Air compression:
For non-calibrated CT scans such as Cone Beam CT and µCT, this compression sets all the gray values corresponding to the first peak in the 3D histogram to zero. This first peak typically consists of air and noise. -
How do I export my .mphtxt file into Comsol?
The .mphtxt file that is generated for the export to Comsol needs to be imported in Comsol as a mesh, not as a geometry. In the "Model Builder" tree, right click on "Mesh1" and choose "Import". Here you can select the .mphtxt file that Mimics exported. Click "Import" to complete. You can find more information on importing a mesh into Comsol in the section "Exporting a file to COMSOL Multiphysics" of the the 3-matic tutorial.
-
What are Hounsfield Units (HU)?
The Hounsfield Units (HU) make up the grayscale in medical CT imaging. It is a scale from black to white of 4096 values (12 bit) and ranges from -1024 HU to 3071 HU (zero is also a value). It is defined by the following:
-1024 HU is black and represents air (in the lungs). 0 HU represents water (since we consist mostly out of water, there is a large peak here). 3071 HU is white and represents the densest tissue in a human body, tooth enamel. All other tissues are somewhere within this scale; fat is around -100 HU, muscle around 100 HU and bone spans from 200 HU (trabecular/spongeous bone) to about 2000 HU (cortical bone).
Metal implants typically have very high Hounsfield units. Therefore, they are attributed the maximum value in typical 12-bit CT scans (3071).
-
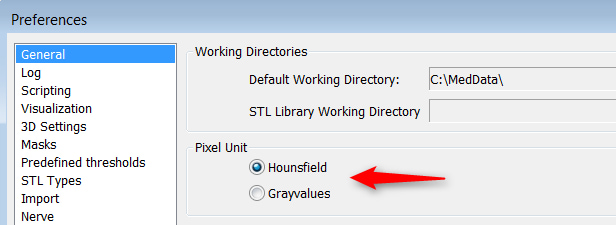
How do I change from Hounsfield Units to Gray Values and back?
You can switch between Hounsfield Units (HU) and Gray Values (GV) in the Preferences. Go to "Options" > "Preferences" > General; here you can change the Pixel Unit.
Selecting Hounsfield will use a scale of -1024 to 3071. Selecting Grayvalues will use a scale of 0 to 4096. Both scales are based on 4096 =12 bit values (212).
-
Why are there no predefined thresholds for MR images?
MRI does not work with a fixed grayscale range like CT. Medical CT images typically consist of 8-bit (4096 values) Hounsfield Units (HU), which is a predefined scale for gray values of tissues in a human body (see the item about Hounsfield Units). MR images can be 8-bit or 16-bit and the range of gray values depends on the MR machine (field strength, gradient, coil,...) and its settings (SE1, SE2,...). Therefore, every MR dataset has a different scale and we cannot provide predefined thresholds.
-
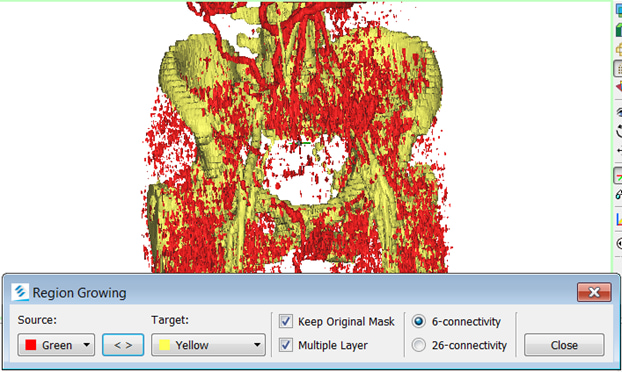
How do I get rid of the noise in my mask?
Use "Region Growing" to select connecting pixels only, and by selecting your region of interest this way.
-
How can I register different image sequences?
On level of the images, you can use the Image Registration tool in Mimics (Image menu). For this to work, both projects need to have the same units (mm, um, etc). You can also use the various registration options in the Align menu to register a part onto the scan, onto a mask, or onto placed landmark points.
-
How to avoid the pop-up dialog "The mask exists out of multiple parts. Continue?"
Your mask consists out of multiple unconnected parts. Use Region Growing (Ctrl + R) to select one region of interest before calculating a Part.
-
Why do I get the notification "Can't interpolate slices"?
This error usually pops up in the "Multiple Slice Edit" tool when you have edited in two neighboring slices. The algorithm needs at least one empty slice between two edited slices in order to interpolate.
-
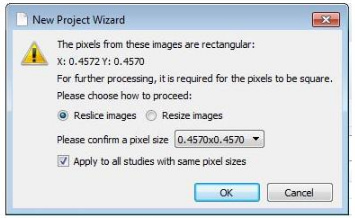
What should I do when my image has rectangular pixels?
You can use the “Reslice Project” tool in the “Image” menu. If you choose to reslice the images, the anatomical proportions will be preserved, but the dimensions and grey values of the dataset will be recalculated and interpolated. The quadratic interpolation will have a small blurring effect on the images.
-
What quality setting should I use to generate my 3D model?
The 'optimal' quality setting will result in the most accurate model possible. It will also apply some optimization techniques - triangle reduction and smoothing. Whenever you create a 3D model you can adjust these settings by clicking "Options" in the "Calculate 3D" window. However, calculating a complex 3D part in optimal quality can take some time, so in some cases you would only want to use this setting on your final 3D model. If you just want to have a quick view of the 3D model, you could use lower quality settings so it will calculate faster.
-
Where is the smoothing and reduce function in 3-matic?
The smoothing and reducing functions are available under the "Fix" menu in 3-matic. Mimics also offers you the ability to perform smoothing and triangle reduction of your STL. In Mimics, the smoothing and reducing functions are located in the "3D Tools" menu.
-
Where is the wrapping function in my remeshing tab in 3-matic?
In 3-matic, the wrapping tool is available under the 'Fix' menu or the 'Design' menu, if you have access to the Design module.
-
How do I save my remeshed part?
After remeshing your part in the 3-matic FEA module, copy (Ctrl + C) your remeshed part, and paste (Ctrl + V) it in your Mimics project. The remeshed part will be added to the Parts. When you copy a volume mesh and paste it in your Mimics project, it will be added as an FEA mesh.
In Mimics you can then do a material assignment to the volume mesh based on the grey values of the DICOM images. There are different export formats available in both, Mimics and 3-matic, to export your remeshed part, volume mesh and assigned material properties for your solver software: Ansys, Abaqus, Nastran, Comsol, Fluent, Patran.
-
How can I change the refinement of my mesh?
Once you have your 3D object created you can optimize the mesh in 3-matic. A tool available to all users of the Base module is 'Improve mesh' in the 'Fix' menu. For more advanced mesh operations the FEA module is required. With the Remesh menu of the FEA module you can apply a 'Uniform Remesh' or 'Adaptive Remesh' to your STL. The latter is specifically intended to improve the mesh of anatomical structures in medical applications.
-
Electronic Instructions for Use

Can’t find what you’re looking for?
Our Help Center is available and supports all of our products, tutorials, and other resources located in the Materialise Academy. Our support team is also available to answer your questions and provide assistance whenever possible. This service is included for customers with a valid maintenance package.
Our products and services
Materialise Mimics Medical
3D medical processing software
Materialise 3-matic Medical
3D Printing, Design, and Remeshing Software
Materialise Mimics Viewer
Communicate your planning, device designs, or personalized models with treating physicians
Materialise SurgiCase
Personalized case intake and management software
Materialise ADAM
Medical data mining and population analysis
Custom Plugins
Customized personalized workflow automation